Image Handling
Abstract
This document provides an overview of image handling, a crucial component in the creation of compute instances. As a fundamental requirement, every compute instance relies on an image to boot and function properly. An image refers to a pre-configured and preinstalled software package, or an installable operating system, that is compatible with the underlying architecture and can be executed by the bootloader. The image serves as the foundation for the compute instance, enabling the deployment of various operating systems, applications, and services.
Images are regional
Image portability is a key consideration, as every image can be utilized within the region, allowing for greater flexibility and deployment options. However, to facilitate this, the Cloud Service Provider (CSP) must replicate the image across all data centers, ensuring that it is readily available and accessible from any location. This process, known as image propagation or synchronization, may incur additional costs, depending on the CSP's pricing model and data transfer policies. To make an image available globally the image can be created with the same name in all regions.
Images are templates
The image serves as a template to provision a new block storage device, which is initialized with the content of the image. Once the block storage device is created and initialized, the original image reference becomes redundant, as the device now contains its own independent copy of the data. Nevertheless, the image reference is retained as part of the block storage device's metadata, allowing for future analysis, auditing, and troubleshooting purposes. This retained reference provides a historical link between the original image and the derived block storage device, facilitating tracking and management of the device's origins and configuration.
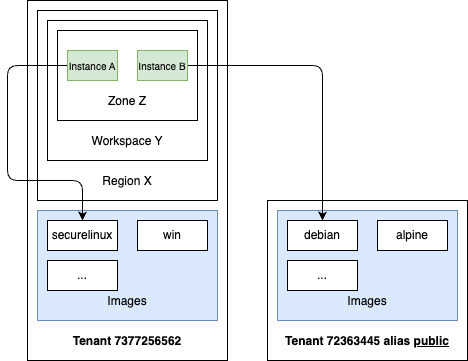
Public Images
The Cloud Service Provider (CSP) can designate a specific tenant, aliased as public,
to serve as a repository for pre-made images. This public tenant hosts a collection of
images that are intentionally made available to all other tenants, facilitating a shared
resource model. Although the public tenant itself is not inherently special, it leverages
the general Role-Based Access Control (RBAC) system to grant access to its images,
ensuring that all tenants can utilize these shared resources. The public images play a
vital role in the bootstrapping process, as they provide the foundational building blocks
for creating subsequent images. In fact, without these public images, the creation of
additional images would not be possible, making them a crucial component of the overall
image ecosystem.
Creating Images
The process of creating new images involves a series of steps that must be followed in sequence. The following procedure outlines the necessary actions:
- Initialization: Create a new instance using a public image and attach an additional empty block device to it. This block device will serve as the target for the new image.
- Network Connectivity: Establish a network connection between the instance and the image source, which may be an external location such as the internet. This connection enables the instance to access and download the new image.
- Image Formatting: The client is responsible for formatting the image according to the required boot process, which may be either BIOS (Basic Input/Output System) or UEFI (Unified Extensible Firmware Interface). The client must ensure that the image is properly formatted to be compatible with the target boot process, as this will determine how the image is loaded and executed during the boot process.
- Image Acquisition: Utilize the instance to download the desired image and copy its contents to the formatted block device. This step transfers the image data from the source location to the new block device.
- Instance Shutdown: Once the image copy and formatting process is complete, stop the instance to ensure that no further changes are made to the block device.
- Image Creation: Use the SECA image API to create a new image, referencing the block device that contains the copied and formatted image contents. This step registers the new image with the system.
- Resource Cleanup: Finally, delete the block devices associated with the instance and the instance using the SECA API. This step releases any allocated resources and ensures a clean environment.
Deleting Images
Deleting an image renders it unavailable for future use, meaning that it can no longer be used to create new block storage devices. Once an image is deleted, it is effectively removed from the system, and any attempts to create a new block storage device using the deleted image will fail.
However, deleting an image does not necessarily mean that it is lost forever. If the image is still needed, it can be recreated at any time by following the same process used to create the original image. This involves re-downloading or re-obtaining the image data, re-formatting it as necessary, and then re-creating the image using the SECA image API.
Updating Images
Once created, images are considered immutable and cannot be updated. If changes are required, the existing image must be deleted and a new image must be created to reflect the updated content. To maintain consistency and avoid potential issues, it is strongly recommended to adopt a versioning scheme for images, rather than attempting to update them in-place.
Using a versioning scheme involves creating a new image with a unique reference, which allows for clear identification and tracking of different image versions. This approach helps to avoid confusion and ensures that all references to an image point to a specific, well-defined version of the content.
For example, if two block storage devices reference the same image, but the image has been updated, it may lead to inconsistencies and unexpected behavior. By using a versioning scheme, you can ensure that each block storage device references a specific version of the image, eliminating potential issues and ensuring that the contents of the image are consistent and predictable.
Best practices
To ensure efficient, secure, and reliable image management, follow these best practices:
- Create a new image for each update or change: Avoid in-place updates to existing images, as this can lead to inconsistencies and unexpected behavior. Instead, create a new image for each update or change, ensuring that each image version is unique and well-defined.
- Use a unique reference for each new image version: Assign a unique reference, such as a version number or identifier, to each new image version. This helps to track changes and updates, making it easier to manage and maintain your image inventory.
- Maintain a versioning scheme: Implement a versioning scheme to track changes and updates to your images. This can include using semantic versioning (e.g., major.minor.patch) or other versioning conventions that suit your needs.
- Delete unused images to optimize resources and reduce costs: Regularly review your image inventory and delete any unused or outdated images. This helps to reduce storage costs, minimize clutter, and improve overall image management efficiency.
- Provide images with updated software to prevent security vulnerabilities: Ensure that your images are updated with the latest security patches and software updates. This helps to prevent the spread of security vulnerabilities and maintains the integrity of your infrastructure.
- Test and validate new images: Before deploying new images, test and validate them to ensure they meet your requirements and are free from defects.
- Document image changes and updates: Maintain a record of changes and updates made to your images, including version numbers, update dates, and descriptions of changes. This helps to track image evolution and facilitates troubleshooting.
- Use labels and annotations to provide context and metadata: Leverage labels and annotations
to provide additional context and metadata about your images. This includes using:
labels.osto specify the operating system used in the image (e.g.,linux).labels.versionto specify the version number of the image (e.g.,3.18).labels.baseto specify the base image or distribution used (e.g.,alpine).annotation.nameandannotation.descriptionto provide a brief summary of the image and its purpose.annotation.releaseto specify the release date of the image in ISO time format (e.g.,2025-01-01T00:00:00Z).annotation.eolto specify the planned end-of-life date for the image in ISO time format (e.g.,2026-01-01T00:00:00Z).annotations.recommendedCputo specify the recommended number of CPU cores for the image (e.g.,2).annotations.recommendedMemoryto specify the recommended amount of memory for the image in GB (e.g.,2).annotations.recommendedNicsto specify the recommended number of network interfaces for the image (e.g.,2).annotations.recommendedStorageSizeto specify the recommended storage size for the image in GB (e.g.,100).
Example
By using labels and annotations effectively, you can provide valuable context and metadata about your images, making it easier to manage, track, and maintain your image inventory.
Example of an image with annotations:
PUT /providers/seca.storage/v1/tenants/152552672/images/debian-container-13

{
  "labels": {
    "os": "linux",
    "version": "13",
    "base": "debian"
  },
  "annotations": {
    "name": "debian Container",
    "description": "The image contains the debian image base including preinstalled software for the use of linux containers",
    "release": "2025-01-01T00:00:00Z",
    "eol": "2026-01-01T00:00:00Z",
    "recommendedCpu": "2",
    "recommendedMemory": "2",
    "recommendedNics": "2",
    "recommendedStorageSize": "100"
  },
  "spec" ...
}
Using a public Ubuntu 24.04 Image:
GET /providers/seca.storage/v1/tenants/public/images/ubuntu-24

{
  "labels": {
    "os": "linux",
    "version": "24.04",
    "base": "ubuntu"
  },
  "annotations": {
    "name": "Ubuntu 24.04 Container",
    "description": "The image contains the Ubuntu 24.04 base including preinstalled software for the use of linux containers",
    "release": "2024-04-25T00:00:00Z",
    "eol": "2026-04-25T00:00:00Z",
    "recommendedCpu": "2",
    "recommendedMemory": "2",
    "recommendedNics": "2",
    "recommendedStorageSize": "100"
  },
  "spec": {
    "cpuArchitecture": "amd64",
    "initializer": "cloudinit-22",
    "boot": "UEFI"
  }
}